Friday, 9 October 2015

Storage Options

Storage Options

  • Android provides several options for you to save persistent application data.
  • The solution you choose depends on your specific needs, such as whether the data should be private to your application or accessible to other applications (and the user) and how much space your data requires. 


 Your data storage options are the following:
Store private primitive data in key-value pairs.
Store private data on the device memory.
Store public data on the shared external storage.
Store structured data in a private database.
Store data on the web with your own network server.
Using Shared Preferences:
  • The SharedPreferences class provides a general framework that allows you to save and retrieve persistent key-value pairs of primitive data types. 
  • You can use SharedPreferences to save any primitive data: booleans, floats, ints, longs, and strings. 
  • This data will persist across user sessions (even if your application is killed).
To get a SharedPreferences object for your application, use one of two methods:
  • getSharedPreferences() - Use this if you need multiple preferences files identified by name, which you specify with the first parameter.


  • getPreferences() - Use this if you need only one preferences file for your Activity. Because this will be the only preferences file for your Activity, you don't supply a name.
    To write values:
  • Add values with methods such as putBoolean() and putString().
  • Commit the new values with commit().

    Example : 
    To Store the data into Shared preferences
    SharedPreferences sharedpreferences = getSharedPreferences(“MyPreferences”, Context.MODE_PRIVATE);
    SharedPreferences.Editor editor = sharedpreferences.edit();
    editor.putString(“Myname”, “xyz”);
    editor.commit();

    To get the data from Shared preferences


    String name = SharedPreferences.putString(“Myname”,””);


Using the Internal Storage:
  • You can save files directly on the device's internal storage. By default, files saved to the internal storage are private to your application and other applications cannot access them (nor can the user). 

  • When the user uninstalls your application, these files are removed.

    To create and write a private file to the internal storage:
  • Call openFileOutput() with the name of the file and the operating mode. This returns a FileOutputStream.
  • Write to the file with write().
  • Close the stream with close().
To read a file from internal storage:
  1. Call openFileInput() and pass it the name of the file to read. This returns a FileInputStream.
  2. Read bytes from the file with read().
  3. Then close the stream with close().
Saving cache files:
  • If you'd like to cache some data, rather than store it persistently, you should use getCacheDir() to open a File that represents the internal directory where your application should save temporary cache files.

  • When the device is low on internal storage space, Android may delete these cache files to recover space.

  • However, you should not rely on the system to clean up these files for you. You should always maintain the cache files yourself and stay within a reasonable limit of space consumed, such as 1MB. When the user uninstalls your application, these files are removed.
Using the External Storage:
  • Every Android-compatible device supports a shared "external storage" that you can use to save files. 

  • This can be a removable storage media (such as an SD card) or an internal (non-removable) storage.

  • Files saved to the external storage are world-readable and can be modified by the user when they enable USB mass storage to transfer files on a computer.
Getting access to external storage:
In order to read or write files on the external storage, your app must acquire the READ_EXTERNAL_STORAGE or WRITE_EXTERNAL_STORAGE system permissions.
For example:
<manifest ...>
    <uses-permission android:name="android.permission.WRITE_EXTERNAL_STORAGE" />
    ...
</manifest>
If you need to both read and write files, then you need to request only the WRITE_EXTERNAL_STORAGE permission, because it implicitly requires read access as well.

Example : 
FileOutputStream outputStream;
File file = new  
File(Environment.getExternalStoragePublicDirectory(
           Environment.DIRECTORY_PICTURES), “hai.txt”);
try {
  outputStream = new FileOutputStream(file);
  outputStream.write(string.getBytes());
  outputStream.close();
} catch (Exception e) {
 e.printStackTrace();

}
Using Databases:
  • Android provides full support for SQLite databases. Any databases you create will be accessible by name to any class in the application, but not outside the application.

  • The recommended method to create a new SQLite database is to create a subclass of SQLiteOpenHelper and override the onCreate() method, in which you can execute a SQLite command to create tables in the database.

  • You can then get an instance of your SQLiteOpenHelper implementation using the constructor you've defined. 

  • To write to and read from the database, call getWritableDatabase() and getReadableDatabase(), respectively. These both return a SQLiteDatabase object that represents the database and provides methods for SQLite operations.
    • You can execute SQLite queries using the SQLiteDatabase query() methods, which accept various query parameters, such as the table to query, the projection, selection, columns, grouping, and others. 

    • For complex queries, such as those that require column aliases, you should use SQLiteQueryBuilder, which provides several convienent methods for building queries.

    • Every SQLite query will return a Cursor that points to all the rows found by the query.

    • The Cursor is always the mechanism with which you can navigate results from a database query and read rows and columns.
    Using a Network Connection:
    You can use the network (when it's available) to store and retrieve data on your own web-based services. To do network operations, use classes in the following packages:


Thursday, 8 October 2015

Arrays

Arrays

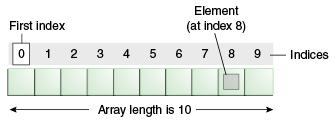
  • An array is a container object that holds a fixed number of values of a single type. The length of an array is established when the array is created. After creation, its length is fixed.

    Illustration of an array as 10 boxes numbered 0 through 9; an index of 0 indicates the first element in the array
    An array of 10 elements.


  • Each item in an array is called an element, and each element is accessed by its numerical index

  •  As shown in the preceding illustration, numbering begins with 0. 

  • The 9th element, for example, would therefore be accessed at index 8.

  • The following program, ArrayDemo, creates an array of integers, puts some values in the array, and prints each value to standard output.


class ArrayDemo {
    public static void main(String[] args) {
        // declares an array of integers
        int[] anArray;

        // allocates memory for 10 integers
        anArray = new int[10];
           
        // initialize first element
        anArray[0] = 100;
        // initialize second element
        anArray[1] = 200;
        // and so forth
        anArray[2] = 300;
        anArray[3] = 400;
        anArray[4] = 500;
        anArray[5] = 600;
        anArray[6] = 700;
        anArray[7] = 800;
        anArray[8] = 900;
        anArray[9] = 1000;

        System.out.println("Element at index 0: "
                           + anArray[0]);
        System.out.println("Element at index 1: "
                           + anArray[1]);
        System.out.println("Element at index 2: "
                           + anArray[2]);
        System.out.println("Element at index 3: "
                           + anArray[3]);
        System.out.println("Element at index 4: "
                           + anArray[4]);
        System.out.println("Element at index 5: "
                           + anArray[5]);
        System.out.println("Element at index 6: "
                           + anArray[6]);
        System.out.println("Element at index 7: "
                           + anArray[7]);
        System.out.println("Element at index 8: "
                           + anArray[8]);
        System.out.println("Element at index 9: "
                           + anArray[9]);
    }
} 
The output from this program is:
Element at index 0: 100
Element at index 1: 200
Element at index 2: 300
Element at index 3: 400
Element at index 4: 500
Element at index 5: 600
Element at index 6: 700
Element at index 7: 800
Element at index 8: 900
Element at index 9: 1000 
 

Declaring a Variable to Refer to an Array:

  • The preceding program declares an array (named anArray) with the following line of code:

// declares an array of integers
int[] anArray;

  • Like declarations for variables of other types, an array declaration has two components: 

  • the array's type and the array's name.

  •  An array's type is written as type[], where type is the data type of the contained elements; the brackets are special symbols indicating that this variable holds an array. 

  • The size of the array is not part of its type (which is why the brackets are empty). 

  • An array's name can be anything you want, provided that it follows the rules and conventions as previously discussed in the naming section. 

  • As with variables of other types, the declaration does not actually create an array; it simply tells the compiler that this variable will hold an array of the specified type.

Similarly, you can declare arrays of other types:

byte[] anArrayOfBytes;
short[] anArrayOfShorts;
long[] anArrayOfLongs;
float[] anArrayOfFloats;
double[] anArrayOfDoubles;
boolean[] anArrayOfBooleans;
char[] anArrayOfChars;
String[] anArrayOfStrings; 
 
You can also place the brackets after the array's name:

// this form is discouraged
float anArrayOfFloats[]; 
 

Creating, Initializing, and Accessing an Array

  • One way to create an array is with the new operator.

  • The next statement in the ArrayDemo program allocates an array with enough memory for 10 integer elements and assigns the array to the anArray variable.

// create an array of integers
anArray = new int[10];
 
If this statement is missing, then the compiler prints an error like the following, and compilation fails:

ArrayDemo.java:4: Variable anArray may not have been initialized.
 
  • The next few lines assign values to each element of the array:

anArray[0] = 100; // initialize first element
anArray[1] = 200; // initialize second element
anArray[2] = 300; // and so forth
 
Each array element is accessed by its numerical index:

System.out.println("Element 1 at index 0: " + anArray[0]);
System.out.println("Element 2 at index 1: " + anArray[1]);
System.out.println("Element 3 at index 2: " + anArray[2]);
 
  • Alternatively, you can use the shortcut syntax to create and initialize an array:

int[] anArray = { 
    100, 200, 300,
    400, 500, 600, 
    700, 800, 900, 1000
};
 
  • Here the length of the array is determined by the number of values provided between braces and separated by commas.

  • You can also declare an array of arrays (also known as a multidimensional array) by using two or more sets of brackets, such as String[][] names

  • Each element, therefore, must be accessed by a corresponding number of index values.

as shown in the following MultiDimArrayDemo program:

class MultiDimArrayDemo {
    public static void main(String[] args) {
        String[][] names = {
            {"Mr. ", "Mrs. ", "Ms. "},
            {"Smith", "Jones"}
        };
        // Mr. Smith
        System.out.println(names[0][0] + names[1][0]);
        // Ms. Jones
        System.out.println(names[0][2] + names[1][1]);
    }
}
 
The output from this program is:

Mr. Smith
Ms. Jones 
 
  • Finally, you can use the built-in length property to determine the size of any array.

  •  The following code prints the array's size to standard output:

Copying Arrays

  • The System class has an arraycopy method that you can use to efficiently copy data from one array into another:

public static void arraycopy(Object src, int srcPos,
                             Object dest, int destPos, int length


 System.out.println(anArray.length);


  • The two Object arguments specify the array to copy from and the array to copy to
 
  • The three int arguments specify the starting position in the source array, the 
    starting position in the destination array, and the number of array 
    elements to copy.
 
The following program, 
 
  •  ArrayCopyDemo, declares an array of char elements, spelling the word "decaffeinated." 
 
  • It uses the System.arraycopy method to copy a subsequence of array components into a second array: 
 

class ArrayCopyDemo {
    public static void main(String[] args) {
        char[] copyFrom = { 'd', 'e', 'c', 'a', 'f', 'f', 'e',
       'i', 'n', 'a', 't', 'e', 'd' };
        char[] copyTo = new char[7];

        System.arraycopy(copyFrom, 2, copyTo, 0, 7);
        System.out.println(new String(copyTo));
    }
}
 
The output from this program is:

caffein